Bohoknits Banner

Bohoknits Banner

Thursday, December 23, 2021

Felted Ornaments

Can also be used as coasters!

Click here for a link to the VIDEO

Time: approx 30-60 mins

Makes approx 2

Supplies:

  • 4-5 grams of roving in a natural fibre like merino wool in a variety of colours; make sure you do not use a superwash fibre; fibre should be prepped in short, fluffy wisps
  • string or sparkle yarn - used for a loop for hanging and for optional blanket stitch around the edge
  • bowl of hot water; as hot as possible (don't burn yourself!)
  • generous serving of dish soap - add to the hot water and mix gently (natural dish soap won't work as well, unfortunately)
  • running cold water
  • sharp needle for attaching loop (and working blanket stitch)
  • scissors for trimming the shape
  • (optional) sparkle / stellina / angel hair - small amount
  • (optional) felting needle for adding details
  • (optional) beads or other embellishments

Instructions

Read through all instructions before beginning.

Step 1 Fluff up your bits of roving and start pulling "bits" off. The goal is to have lots of fluffy, wispy short pieces.


Layer them as shown in the photos - first lying horizontally and then vertically and then start building up thin layers. Flip the pile over carefully and continue adding bits of fluff willy nilly. You will want about 8-10 layers with no bald or thin spots. More layers will create a thicker piece of felt, but it will also take longer.

If you have any wisps sticking out, you can tuck them around the edge. If you wish to add some sparkle, add a small amount in a few places, but be sure not to have it on the surface - the sparkle itself will not felt, so you will need at least a bit of wool on top to "lock" it in.


You can try to create a loose shape as you build your layers, but you can also create your piece of irregular felt and use the scissors to cut out your shape later.

Your pile should be 30-40% larger than the final desired size. The size will shrink down as the roving felts (but it will reach a point where it will no longer shrink).


Step 2 Once you have your little pile, use your fingertips to dribble a small amount of hot, soapy water over the wool. It should NOT be sopping wet. Just a few drips to start is fine.
Flip the pile over carefully and dribble more on the other side. You are now ready to felt!


Step 3 Start working the fibres with your fingertips. Be very gentle at first and try not to disturb your fluffy bits too much. Make sure you do not get any sections that fold over - they will not "velcro" together later. This stage is crucial to the final object. You will not be able to alter it much after this point except in size. Go slow until you get the hang of it.

Step 4 Once the felted piece becomes more firm, you can start to be more aggressive with your friction. Try different techniques and keep working your foamy pancake for about five minutes. It should be quite soapy and foamy.


Step 5 Run your piece under cold water until the soap is mostly gone. The cold water will help "shock" the scales on the fibre which will help it felt and velcro together.

Step 6 Dip the piece in the hot, soapy water and repeat steps 3-5. Rinse with cold water until it's free of soap. Allow it to dry completely. Use your scissors to trim the edges or leave it irregular; you can also cut out a specific shape.

Step 7 Add your embellishments! Add a loop to the edge, work a blanket stitch around the edge (click for link to video help). You can also add beads or other trimmings with your felting needle.

Enjoy!
 

Tuesday, February 2, 2021

Links to Interviews and Collaboration Partners


Links to Interviews

Knittingrobin

Cravings

Olann and

Rosehaven Yarns Podcast

Bakery Bears Knitability Issue 4


Collaboration Partners

Rosehaven Yarn Shop

Knit and Caboodle Yarn Shop

Shepherd's Hill Farms

Knotions (Fae Wing Shawl)

Knit Crate (Moonwalk Legwarmers)

Knit Crate (Aeronaut Armwarmers) 

SHED Chetwyn Farms 

Signature Needle Arts 

PEC Fibre Fest

Friday, June 9, 2017

Honeymoon Alert

I’M ON MY HONEYMOON! Bohoknits is knitting up a storm on a private island this week!
I will be back June 18th and will do my best to catch up when I return, but there is no wifi where I’m going. :)

If there is a pattern you are desperate for, you can purchase any of them via Ravelry and get your PDF download instantly!

http://www.ravelry.com/designers/kelly-mcclure

Monday, May 23, 2016

NYC Vacation

VACATION ALERT!!

Bohoknits will be knitting up a storm in NYC until June 1, 2016
Please feel free to contact me, but there may be a delay in my response. 

kelly@bohoknits.com

If you would like to purchase a pattern, I suggest visiting my Ravelry page where you can get instant downloads (and free stuff, too!)

Tuesday, December 29, 2015

Holidays!

Bohoknits will be on a beach somewhere until 
January 7th! 

If you would like to purchase patterns, please visit Ravelry.com for instant PDF downloads. 

If you have any questions, feel free to email me and I will respond as soon as I return. 

Happy Holidays!

kelly@bohoknits.com


Monday, January 19, 2015

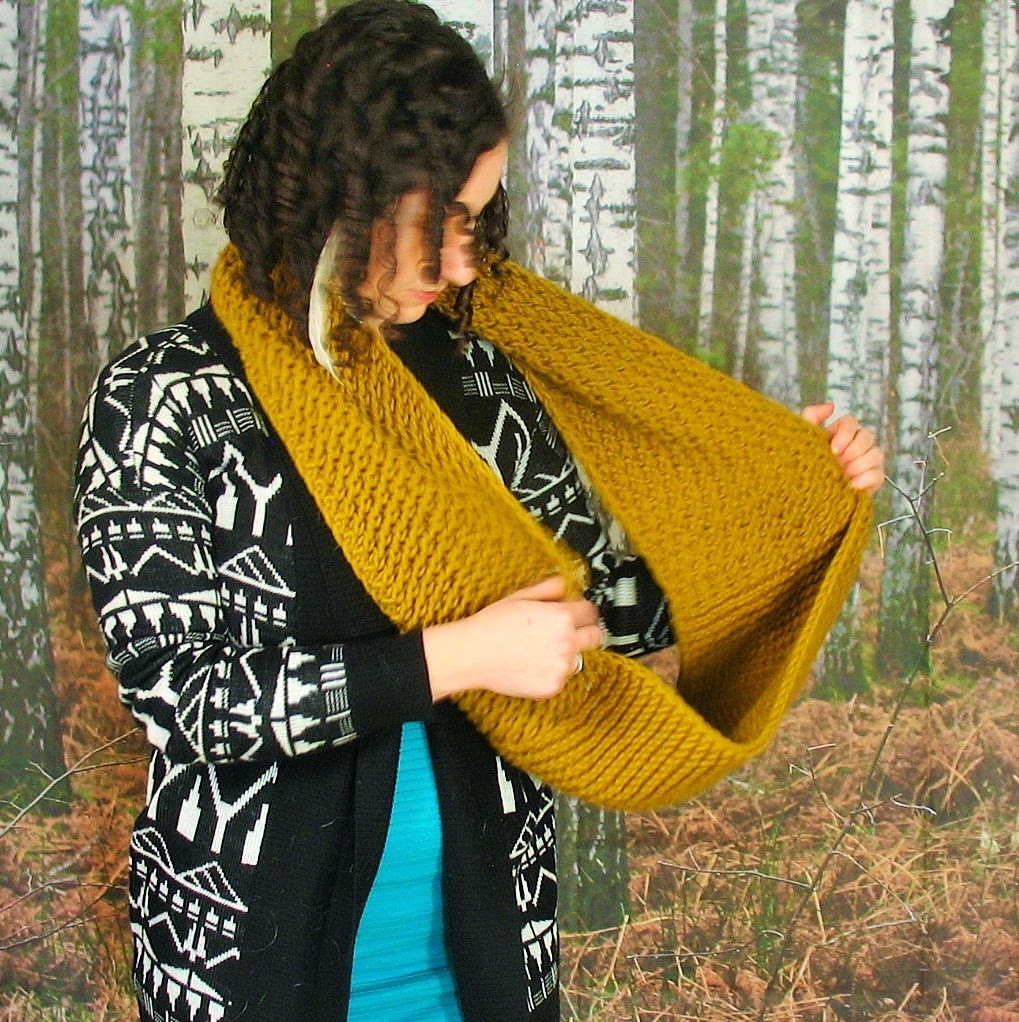
Timber Cowl


Cuddle up and stay warm this winter with this textured accent cowl. It knits up quickly and easily with a bulky yarn. It’s perfect for a stroll around town or in the woods.

This cowl is lightweight, but warm. It has slipped selvage stitches for clean and soft edges. 
It is also reversible! 

This cowl is knitted flat with three different basic stitches for lots of texture. The cowl is then attached in the round. There is no visible seam.

Skill Level: 
Rookie-Apprentice-Virtuoso-Genius

Skills: knit, purl, yarn over, K2tog, provisional cast on, three needle bind off
Note: “normal” CO and BO can be used

Sizes: one size

Finished Measurements:
approx 19 cm wide and 71 cm long lying flat folded (142 cm long before joining in a circle)

Gauge: 
approx 13 stitches and 19 rows = 10 cm in St st on 6.5 mm as given on Lion Brand Woolspun ball band

Yarn: bulky acrylic-wool blend

Suggested Brand: 
2 skeins Lion Brand Woolspun 
80% acrylic, 20% wool
116 m per 100 g
shown in colour 130 Honey and 149 Charcoal

+ scrap yarn for provisional CO

Needles: 
8 mm straight 
one extra needle for three needle BO
large crochet hook for provisional CO
or size needed to obtain gauge

Other Materials: tapestry needle or teeny crochet hook


Instructions:

CO 26 sts with provisional method. 

Note: You may instead CO with backwards loop method. You will then BO normally and sew the ends together.

Cowl is worked back and forth (flat). If you would like to make your cowl wider, CO a multiple of 2 sts.

Note: The first st of every row is slipped kwise and the last st of every row is purled (included in instructions).

First Section:

Garter Stitch
Row 1: Knit to last st, purl.
Row 2: Sl 1 kwise, knit to last st, purl.

Repeat Row 2 only until section measures approx 46 cm/18” from CO. 

Second Section:

Double Moss Stitch
Row 1-2: Sl 1 kwise, *K1, P1*, rep from * to * to last st, purl.
Row 3-4: Sl1 kwise, *P1, K1*, rep from * to *  to last st, purl.

Repeat these 4 rows until section measures approx 46 cm/18” from end of first section.

Third Section:

Mesh Stitch 
Row 1: Sl 1 kwise, K1, *YO, K2tog*, rep from * to * to last 2 sts, K1, P1.
Repeat this row until section measures approx 46 cm/18” from end of second section.

Finishing:

Place sts from provisional CO onto empty needle. Make sure you have ended on the correct row for a three needle BO (so needles are facing the same way - if not, just work one more row). 

Follow instructions below for a three needle BO and weave in ends. 

Resources:

Provisional Cast On
stitchdiva.com/tutorials/knitting/provisional-cast-on

Three Needle Bind Off
knitty.com/ISSUEfall06/FEATfall06TT.html


Wednesday, March 19, 2014

Sea Monkey Baby Hat

 
This hat is a favourite baby gift and knits up really quickly (for those last-minute gifts). Cotton is nice and soft for babies, plus the little ears are just so darn adorable. 
The pattern features three different sizes and three brim styles. It is constructed from the bottom up on circular needles.


Skill Level: Rookie-Apprentice-Virtuoso-Genius
Skills: knit, purl, grafting/Kitchener stitch (optional)

Sizes: newborn; 0-6 mos; 6-12 mos
Gauge: 18 sts and 28 rows per 4" on 5 mm in st st (20 sts = 4" on
4.5 mm as given on ball band)


Yarn: 50 g, 90 yds (82 m) worsted weight cotton (dishcloth cotton is perfect!)
Suggested Brand: 1 ball Sugar n’ Cream cotton

Needles: 5 mm 16" circular; 5 mm dpns (for grafting - optional) or size needed to obtain gauge

Other Materials: tapestry needle or teeny crochet hook; 1 stitch marker


Instructions:

CO 52 (60, 68) sts, join in the round being careful not to twist sts. Pm for beg of rnd.
Work either Brim 1, 2, or 3.


Brim 1: (roll) Knit in St st for 6 rows.
Brim 2: (rib) K2, P2, repeat to end of row; repeat this row 3 times more.
Brim 3: (garter, shown in blue) Knit 1 row, purl one row; repeat these two rows two times more.
 

All styles:
Change to St st and knit until hat measures 5-5.5-6" from CO (if you are making the roll brim style, measure from the bottom of the roll and not the CO edge). It may seem tall for a baby hat, but it will shorten after you make the ears.

Finishing: You can either BO all your sts and then sew up the top with a darning needle, or graft (kitchener st) your sts together. Do not cut yarn.

Ears: Once the top is closed up, insert your needle from the inside about 1.5 inches from the top corner and pull through. Wrap the yarn tightly around the corner a few times; fluff out the ear and give it a few tugs until it is the shape you desire, then tie off and weave in the ends. For the second ear, cut a length of yarn and attach it 1.5" from the top corner and repeat the rest of the instructions.

Notes and Tips:

• After tying off the ears, use your needle or crochet hook to pull the ends into the ear itself and then trim; this way you don't need to worry about weaving inthe ends, but make sure your knots are secure.
• If you choose to graft the top together, be sure to change to dpns first.


Friday, November 15, 2013

Philosopher Sleeves


Everyone needs some philosopher sleeves to help with reading, thinking, tea drinking - whatever you like to do! The smallest size only uses one skein of sock yarn, so dive into your stash 
and pull out that one special skein you’ve been saving.

These fun sleeves are knit from the top down to the wrist and have basic shaping for a sleek fit. 
The optional elbow patches are knit separately and sewn on later.


Skill Level: Rookie-Apprentice-Virtuoso-Genius
Skills: knit, purl, ssk, K2tog, M1

Sizes: adult xs, s, m, l
Finished Measurements: xs measures approx. 3.5" wide at mid-arm and 20" in length (shown)
Gauge: approx. 28 sts and 44 rows = 4" in St st on 3 mm needles 

Yarn: 100% superwash merino (MC), 114-228 g/4-8 oz, 395-790 yds (361-722 m); small amount of CC in fingering weight (for elbow patches); Note: xs requires one ball, larger sizes require two balls
Suggested Brand: 1-2 skeins of Tosh sock fingering weight merino (shown in William Morris)

Needles: 2.5 mm dpns; 3 mm dpns or size needed to obtain gauge

Other Materials: tapestry needle or teeny crochet hook; 1 stitch marker


Instructions: (Make two.)

Starting at the top of the sleeve, CO 70 (75/80/85) sts with long-tail method and smaller needles in MC. Join in the rnd, being careful not to twist sts. Pm for beg of rnd. Divide sts evenly on needles.

Work in K3, P2 ribbing for 1.75" (approx. 18 rnds) or to desired length of top cuff. Change to larger needles and St st.

Next: Knit 10 rows even.
Dec rnd: K1, K2tog, knit to last 3 sts, ssk, K1.

Rep these 11 rnds 4 times more. 10 sts decreased.

Work even in St st until sleeve measures approx. 14.5 (14.5/15/15)" from beg. Try them on. They should end 3-4 inches below the wrist.

Note: If you would like a slouchier look, work extra rnds here. 
If you would like to get away with making a larger size with a single ball of yarn, you may want to make the total length shorter here.

Next: Rep dec rnd once.
Next: Knit 4 rnds even.

Rep these 5 rnds 4 times more. 10 sts decreased. 50 (55/60/65) sts rem.
Try sleeve on again. Work extra rnds here if you like. They should be 1" shorter than total length.

Change to smaller needles. Work K3, P2 rib for 1” (approx. 10 rnds).


BO fairly loosely in rib or use a 3 mm dpn to bind off. Weave in ends.

Elbow Patches: (Make two.)

CO 15 sts with smaller needles and long-tail method in CC.

Knit 2 rows.
Row 1 (RS): K2, M1, knit to last 2 sts, M1, K2.
Row 2 (WS): K2, purl to last 2 sts, K2.
Rep these two rows four times more. 25 sts total.

Next: Knit.
Next: K2, purl to last 2 sts, K2.
Rep these two rows 7 times more.

Decreases:
Row 1: K2, ssk, knit to last 4 sts, K2 tog, K2.
Row 2: K2, purl to last 2 sts, K2.
Rep these two rows four times more, ending with a Row 1. 15 sts total.

Knit three rows. BO kwise. Weave in ends.

Try on your sleeve, making sure the shaping runs down the inside of your arm. Place the patch on your elbow and mark the placement or pin it on. Sew it in place. Enjoy!


Sunday, July 28, 2013

More Natural Products for Knitters

After a long hiatus from the blogging world, Bohoknits is back at it with
new designs, free patterns and more! Here is a follow-up to my popular post,
have been working full-time in the Natural Health Industry (hence the hiatus),
which has given me the opportunity to explore some of these products
and how they can help knitters.
 

Red Reishi and Holy Basil (aka Tulsi)
Is it any wonder I am often referencing stress when talking about knitting? Most of us knit to unwind at the end of a long day, but the hobby itself can often be stressful (just ask the blanket I've ripped back twice this week!). Whenever my nerves start to get the best of me (in life or in knitting), I turn to herbal remedies. My two favourites are Reishi mushroom, known for its grounding and anti-stress properties. I take it in liquid tincture form or powdered in capsules from Purica. Another herb I rely on quite a bit is Holy Basil. This is an ayurvedic plant that noticably (and immediately) lifts your mood and makes all those little annoyances in life (like dropping a stitch) seem like no big deal. I take it in liquid-capsule form from Botanica or drink it as a lovely, flavourful tea from Organic Traditions.


Spoonk
This is one of those things that you can't believe you ever lived without.The Spoonk is an acupressure mat made of little plastic "spikes" that envigorate your system, relax your mind and deal with physical and emotional stress in one bound. Sore muscles, tired mind - just a few minutes of standing on my spoonk and I feel so much better. "The mat stimulates specific reflex points throughout the body, releases blocked energy, eases tense muscles and creates deep mental and physical relaxation." I take it on the airplane and have it open at home so I can stand on it anytime. But don't limit yourself to standing on it. You can lie on it to treat back pain (or sore knitting shoulders), use it as a pillow to treat headaches (from reading those pesky lace charts) or target any area that might be bothering you.
 

Chinese balls (aka Baoding Balls)
I have been using these since I was a child, but I never realized their applications for knitters until recently. They are the perfect tool to provide hand strength and general balancing. When you have been knitting hard, make sure to take a break and spin these around for a few minutes. They will work different muscles in your hands to prevent injury and the gentle ringing they make provides a nice soothing break for the mind. They also make beautiful, little objects! 
How to use them: Rotate them by rolling your fingers. Work clockwise and counterclockwise making sure to alternate hands. Eventually you can work on your speed and trying to avoid contact between the balls, but don't push yourself  too hard - these are meant to be a meditative exercise. 


Matcha Green Tea
I drink green tea all day for the many health benefits, but one of my favourite kinds is matcha tea. Matcha comes in a fine powder which can be whisked up into a frothy delight (or try a latte with almond milk). Because you are ingesting the whole tea leaf instead of an infusion of the leaves, it has more benefits than a regular cup of tea. One of the active chemicals in any green tea, theanine, works wonders on our bodies. It is an amino acid that helps to create a feeling of focused calm. Its psychoactive propterties cross the blood brain barrier, making it a quick and effective remedy for stress and "murky mind". Be cautious about drinking matcha later in the evening as it will give you a bit of an energy boost!


Arnica
In my last post on natural products for knitters, I referenced mint oil as a great analgesic for sore hands and I stand by that. But a new favourite for me is Arnica cream. This is a herbal, homeopathic remedy that is capable of penetrating deep into the tissue. It is very gentle and soothing, making it great for sore hands or any kind of arthritis or injury. Try Traumeel or Arnicare from Boiron.


 EFAs
Essential Fatty Acids are necessary for good health, whether you are a knitter or not. There are many benefits systemically, but for knitters taking a fish oil supplement - or vegan equivalent - is essential to keep joints lubricated and to prevent injury. Knitters of all ages wind up with sore joints caused by inflammation, but that shouldn't stop you from casting on. EFAs ensure that cell membranes carry out their functions as they should. Try taking a fish oil supplement daily and you will soon notice the effects. I like to take mine in liquid form since it's more concentrated, but some don't enjoy the oily feeling in their mouths. Luckily now they have delightful flavours with no fishy "burp back". My favourites are Nutrasea from Ascenta (they have yummy flavours like Apple and Mango!) and Karlene's Sealicious. If you really can't stomach the liquid form, try some gel caps from Nordic Naturals.


Kindle
I am a die-hard book lover. Being a bit of a Luddite when it comes to technology, I don't even own a cell phone. So, I was very resistant to an e-reader at first and declared that I would never give up reading paper books. Until I realized the main benefit to having an e-reader: you can now read and knit at the same time! In my last post I was touting the benefits of using a book stand. The only downside to that is it takes time to turn each page (a few stitches worth of time at least). Now all I have to do is quickly tap my kindle and I can seamlessly keep reading and knitting, barely missing a beat (I chose the kindle touch). There are other obvious, non-knitting related benefits to a kindle, which I will leave to other bloggers and reviewers to explore (lightweight and compact, stores mutiple books, environmentally friendly), but the benefits to knitters are incredible. Heck. You can even knit a cozy for your kindle. I still curl up with a good paper book in bed, but if my needles are in hand, you can be sure that my kindle is close by.


For other ideas on how to soothe those knitting nerves natuarlly,
visit my original post.

Friday, November 23, 2012

Escarpment Cowl

 
Cuddle up in this snuggly, cozy cowl. It knits up in no time using a bulky fisherman’s rib
and looks great with any outfit. The fabric is stretchy and mushy making it extra comfy.
 
This cowl is knit flat using a provisional cast on - the ends are then grafted together. Stitches are slipped at the sides making a soft edge and clean lines. This cowl has one size and has a slightly visible seam.


Craft: Knitting
Skill Level: Rookie-Apprentice-Virtuoso-Genius
Skills: knit, purl, K1b (instructions given), provisional cast on, three needle bind off or grafting (Kitchener stitch)

Sizes: one size
Finished Measurements: approx. 12" wide and 30" folded in half lying flat (60" long)
Gauge: not crucial; approx. 11 sts and 16 rows = 4" (but it is very stretchy)
Yarn: 250 g (8.8 oz.), 325 yds (315 m) bulky (12 ply) weight wool
Suggested Brand: 2.5 skeins  Berocco Vintage Chunky
(50% Acrylic, 40% Wool, 10% Nylon)

Needles: 8 mm (US 11) straight or circular needles (+ extra needle for three needle BO)
Other Materials: scrap yarn for provisional cast on; extra 8 mm needle of any kind; large crochet hook or darning needle to weave in ends


Stiches:
K1b = Knit one below
Insert your needle one row below the next st. It should look like a purl is facing you on the next st - insert your needle under this purl. When you move the stitch off the left needle, you should see the stitch "drop" to the next row and then sit there. This helps opens up the fabric.


Instructions:

See below for Rookie Version.

With scrap yarn, CO 30 sts with provisional method.
 

Cut scrap yarn. Attach main yarn.
 

Row 1: Knit.
Row 2: Sl 1 kwise, knit to last st, purl.
 

Row 3: Slip 1 kwise, *K1, K1b*, rep from * to * to last st, P1.

Rep Row 3 only until your cowl measures 152 cm/60" from CO.


Undo sts from provisional CO and place on your spare 8 mm needle. Make sure the cowl is lying flat with no twists, folded in half.
 

You can either loosely graft/Kitchener stitch the sts together or use a three-needle bind off; for a less visible seam, try grafting in rib. Weave in ends.

Rookie Version:
Cast on 30 sts with regular backwards loop method and main yarn.
Knit the scarf as written above.
Bind off loosely and sew ends together


Thursday, July 26, 2012

2013 Crochet Calendar

Bohoknits had been published!


Check out June 21st in this 2013 crochet calendar for a cute, crocheted toque. The calendar is published and compiled by Susan Ripley and I'm honored to be included! 

There are over a hundred patterns in this cute box set, including afghans, accessories, baby items, toys, bags and purses, mittens and gloves, scarves and cowls, and, of course, hats!

This calendar is handy because you can pull each day out of the box as the year passes, or if you find a pattern that tickles your fancy, you can take the page along with you in your project bag without the hassle of toting a book around. Enjoy!

Get your copy HERE.

Wednesday, March 28, 2012

Coming Soon!

Hi folks! 

I wanted to put up a little post saying that I will be away until April 8th to teach knitting in Nepal!! Yahooo! This means I am taking a little break from all things internet. Feel free to leave me any comments or questions, but just know that I won't reply right away.

When I return, I will be officially releasing my new eBook: Bohohats. Here is a sneak peak at some "behind the scenes" photos. Keep your eyes peeled for this amazing collection of hats with three never before released patterns! As you can see from my cartwheels, I'm very excited about this.

Monday, January 2, 2012

The Other Side of the Needles

Guest Blogger!! 
My boyfriend was kind enough to write this article for the shop's newsletter. The theme was "Men and Knitting". To sign up, visit the website: Knit and Caboodle

photo: Ambler

Relationships are all about give and take. For example, I pretend to care about my boyfriend’s video games and he pretends to care about my current knitting project. I sympathize when he is bludgeoned by a hoarde of killer zombies and he sympathizes when I have to frog an entire sweater. Here is the perspective of one man who struggles with co-habitating with an obsessed knitter...

"It seems to me that there are two types of knitters in this world: the casual knitters, and those for whom knitting is a lifestyle. A casual knitter, like my mother, picks up her needles for an hour here and there until her project is done, and it could be weeks or months before she starts the next one. On the other hand, more dedicated knitters, like my girlfriend, only put their needles down long enough to make a meal, change a diaper, or pour a cup of tea. By the time they have started working on one project, they have already planned out the next three. Passionate knitters are great multi-taskers, able to knit at the same time as walking, talking, eating or watching T.V.

In my experience, living with a "yarnie" means yielding your share of living space to an ever-expanding, sprawling stockpile of fibre. To cross the house I have to navigate my way through a labyrinth of baskets of balls and bags of half-finished, long abandoned projects. It also means finding balls of yarn in unexpected places like kitchen cupboards, behind rolls of toilet paper and in dresser drawers. Knitting needles pose an omnipresent risk, especially when they are poking out of the couch cushions or when they come flying at my face while a certain knitter is wildly gesticulating during a heated rant (most likely about the injustice of a poorly plotted colour chart or the like).

In our case, her knitting enthusiasm is not just confined to the house. It’s impossible to take her out for a romantic dinner without at least one project in her purse, “just in case”. Being out in public with her means strangers clad in handmade sweaters aren’t safe from her barrage of friendly questions: “Oh! Did you make that yourself? Is that angora?” I have come to terms with the fact that there might be a hobby farm in my future...but only one that has llamas, alpacas and angora rabbits. Also, you know that your girlfriend is fanatical about yarn when she is on a first name basis with the yarn shop employees.

Now, it’s not like she’s not totally selfish with her hobby; I do get to share in her love for knitting, but usually it’s to help wind a skein (hands up!) or to give my educated opinion on which buttons to choose. Mind you, while she is focused on a complicated pattern, it does afford me time to devote to my own interests (zombies). I never hear complaints about playing too many video games while there is a crochet hook in her hand. Obviously the best thing about dating a knitter is the handknit socks and toques I am often lucky enough to receive.

I’m sure there are many other significant others out there who can relate to these experiences, whether your knitter is kind of casual or more devoted to knitting. Anyone interested in a Boyfriends of Knitters Support Group (BOK)?"

Thanks so much for those words from my loving boyfriend! Kinda unrelated, but here are some graphics from the same issue to make you smile: 

As my boss would say, Don't you love his "come hither" look?

Monday, November 28, 2011

Block By Block: Blocking Tutorial


There is nothing like the feeling of casting off that last stitch and weaving in the very last end. Often, that moment of purity lasts about five seconds before you realize that you need to block your project. Usually, this means waiting at least another whole day before you can proudly wear your garment in public. However, blocking can be a very rewarding exercise and often makes a major difference in the quality of your finished object. Here are some reasons to block and how to do it.

Reasons to block:
When natural fibres are wet, they become relaxed, allowing you to “shape” the fabric. This allows you to manipulate the form and size of your pieces (within reason, of course). Blocking also evens out your stitches, making your fabric smooth and more consistent. For lace projects, blocking opens up those stitches so the world can see all the hard work you’ve put in. Choosing a blocking method to match your project takes practice and intuition, but once you start blocking your projects, it’s hard to stop!
A note on fibre:
Cockleshells Scarf by Kelly McClure
Blocking is most effective with natural fibres and non-superwash wool. Since superwash wools are chemically treated to retain their shape, they won’t alter much when wet – or, at least, they shouldn’t. Acrylics behave in much the same manner. Blocking might help “flatten” the piece out, but it won’t help with curling edges or retaining the shape. And unless melted plastic is part of your aesthetic vision, never iron acrylic yarn. Cotton will respond to blocking, but tends to sag and has no memory, so beware. Also be aware of wet blocking silk, cashmere, alpaca, and llama, as those fibres tend to become fragile in water. As a general rule, be very gentle! You can always block something with a little more fervor, but you can’t undo a mistake. Just to be sure, always read your yarn label washing instructions before casting on.
 
Steam block:
Turn on your iron and set it to the correct setting (wool, silk, or cotton). Lay your project out as flat as you can on your ironing board or on a towel on a hard, flat surface. Make sure your iron is clean, or, especially if it is a luxury fibre, place a thin towel over your project. Spritz your piece gently with a spray bottle of water and pat the water into the fibres. Gently run the iron over your fabric. Alternatively, you can dampen a thin towel and gently press the iron over your piece (press, don’t drag). If your iron has a steam setting, try holding it above the fabric (especially for luxury fibres) and steam without touching the yarn. Be aware of snags and edges since your iron can catch and pull on cables and embellishments. If you are steam blocking a lace project, you can either pin and then block, or block and then pin, depending on the fibre and pattern you’ve chosen. 
 
Swallowtail Shawl by Evelyn A. Clark

Wet block:
Soak your piece in a sink full of tepid water and add some wool wash or hair conditioner to soften up your fibres (and make your project smell loverly). Being careful not to make felt, give it a few good squeezes underwater to rid the fibres of air bubbles. Soak for 20-30 minutes. Carefully squeeze out as much water as you can without causing harm to your garment. Do not wring! You can rinse with the same temperature of water if you like, but most wool rinses can be left in. Set out a thick towel on a flat surface. Carefully lay out your project on your towel. Make sure your project is in exactly the shape and size you would like and make sure it is perfectly flat. Slowly “steam roll” your project in the towel ensuring it is flat and even. Squeeze the towel as much as you can to soak up the water. When you unroll it, place your garment on another dry towel or garbage bag, reshape, and leave flat to dry. Depending on the fibre, you can “fluff” it up in the dryer for a few minutes when it’s done (don’t forget about it!). If you are wet blocking a lace project, use (rust-proof) pins to keep it in place or invest in a set of blocking wires.
Extra tips:
·     Be as gentle as possible when combining water and fibre – don’t agitate your wool while it’s wet or else you will end up with felt.
·     You can block in pieces or after you’ve seamed them together – everyone has a favourite method. Stephanie Pearl-McPhee will block while the project is still on her needles!
·      Always block your gauge swatch before you begin knitting.
·      Add buttons, notions and/or appliques post-blocking.
·      Add some vinegar to your soaking bath if you are worried about colour fastness.
·       Use blocking wires to give shape to lace projects.
·       Weave in your ends before you block, but trim them post blocking.
·       Don’t forget that you can always re-block something.


This article originally appeared in the Knit and Caboodle April 2011 newsletter.