Bohoknits Banner

Bohoknits Banner

Monday, January 19, 2015

Timber Cowl


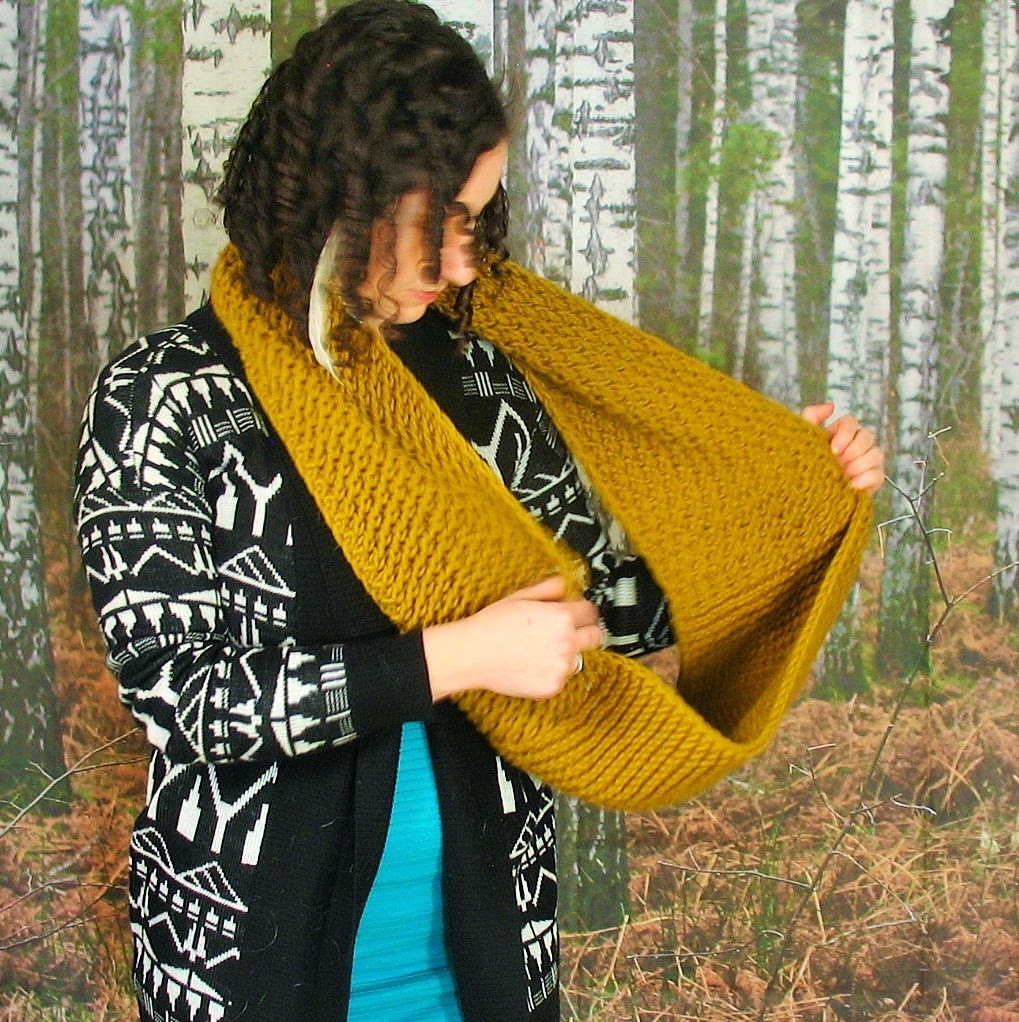
Cuddle up and stay warm this winter with this textured accent cowl. It knits up quickly and easily with a bulky yarn. It’s perfect for a stroll around town or in the woods.

This cowl is lightweight, but warm. It has slipped selvage stitches for clean and soft edges. 
It is also reversible! 

This cowl is knitted flat with three different basic stitches for lots of texture. The cowl is then attached in the round. There is no visible seam.

Skill Level: 
Rookie-Apprentice-Virtuoso-Genius

Skills: knit, purl, yarn over, K2tog, provisional cast on, three needle bind off
Note: “normal” CO and BO can be used

Sizes: one size

Finished Measurements:
approx 19 cm wide and 71 cm long lying flat folded (142 cm long before joining in a circle)

Gauge: 
approx 13 stitches and 19 rows = 10 cm in St st on 6.5 mm as given on Lion Brand Woolspun ball band

Yarn: bulky acrylic-wool blend

Suggested Brand: 
2 skeins Lion Brand Woolspun 
80% acrylic, 20% wool
116 m per 100 g
shown in colour 130 Honey and 149 Charcoal

+ scrap yarn for provisional CO

Needles: 
8 mm straight 
one extra needle for three needle BO
large crochet hook for provisional CO
or size needed to obtain gauge

Other Materials: tapestry needle or teeny crochet hook


Instructions:

CO 26 sts with provisional method. 

Note: You may instead CO with backwards loop method. You will then BO normally and sew the ends together.

Cowl is worked back and forth (flat). If you would like to make your cowl wider, CO a multiple of 2 sts.

Note: The first st of every row is slipped kwise and the last st of every row is purled (included in instructions).

First Section:

Garter Stitch
Row 1: Knit to last st, purl.
Row 2: Sl 1 kwise, knit to last st, purl.

Repeat Row 2 only until section measures approx 46 cm/18” from CO. 

Second Section:

Double Moss Stitch
Row 1-2: Sl 1 kwise, *K1, P1*, rep from * to * to last st, purl.
Row 3-4: Sl1 kwise, *P1, K1*, rep from * to *  to last st, purl.

Repeat these 4 rows until section measures approx 46 cm/18” from end of first section.

Third Section:

Mesh Stitch 
Row 1: Sl 1 kwise, K1, *YO, K2tog*, rep from * to * to last 2 sts, K1, P1.
Repeat this row until section measures approx 46 cm/18” from end of second section.

Finishing:

Place sts from provisional CO onto empty needle. Make sure you have ended on the correct row for a three needle BO (so needles are facing the same way - if not, just work one more row). 

Follow instructions below for a three needle BO and weave in ends. 

Resources:

Provisional Cast On
stitchdiva.com/tutorials/knitting/provisional-cast-on

Three Needle Bind Off
knitty.com/ISSUEfall06/FEATfall06TT.html


Wednesday, March 19, 2014

Sea Monkey Baby Hat

 
This hat is a favourite baby gift and knits up really quickly (for those last-minute gifts). Cotton is nice and soft for babies, plus the little ears are just so darn adorable. 
The pattern features three different sizes and three brim styles. It is constructed from the bottom up on circular needles.


Skill Level: Rookie-Apprentice-Virtuoso-Genius
Skills: knit, purl, grafting/Kitchener stitch (optional)

Sizes: newborn; 0-6 mos; 6-12 mos
Gauge: 18 sts and 28 rows per 4" on 5 mm in st st (20 sts = 4" on
4.5 mm as given on ball band)


Yarn: 50 g, 90 yds (82 m) worsted weight cotton (dishcloth cotton is perfect!)
Suggested Brand: 1 ball Sugar n’ Cream cotton

Needles: 5 mm 16" circular; 5 mm dpns (for grafting - optional) or size needed to obtain gauge

Other Materials: tapestry needle or teeny crochet hook; 1 stitch marker


Instructions:

CO 52 (60, 68) sts, join in the round being careful not to twist sts. Pm for beg of rnd.
Work either Brim 1, 2, or 3.


Brim 1: (roll) Knit in St st for 6 rows.
Brim 2: (rib) K2, P2, repeat to end of row; repeat this row 3 times more.
Brim 3: (garter, shown in blue) Knit 1 row, purl one row; repeat these two rows two times more.
 

All styles:
Change to St st and knit until hat measures 5-5.5-6" from CO (if you are making the roll brim style, measure from the bottom of the roll and not the CO edge). It may seem tall for a baby hat, but it will shorten after you make the ears.

Finishing: You can either BO all your sts and then sew up the top with a darning needle, or graft (kitchener st) your sts together. Do not cut yarn.

Ears: Once the top is closed up, insert your needle from the inside about 1.5 inches from the top corner and pull through. Wrap the yarn tightly around the corner a few times; fluff out the ear and give it a few tugs until it is the shape you desire, then tie off and weave in the ends. For the second ear, cut a length of yarn and attach it 1.5" from the top corner and repeat the rest of the instructions.

Notes and Tips:

• After tying off the ears, use your needle or crochet hook to pull the ends into the ear itself and then trim; this way you don't need to worry about weaving inthe ends, but make sure your knots are secure.
• If you choose to graft the top together, be sure to change to dpns first.


Friday, November 15, 2013

Philosopher Sleeves


Everyone needs some philosopher sleeves to help with reading, thinking, tea drinking - whatever you like to do! The smallest size only uses one skein of sock yarn, so dive into your stash 
and pull out that one special skein you’ve been saving.

These fun sleeves are knit from the top down to the wrist and have basic shaping for a sleek fit. 
The optional elbow patches are knit separately and sewn on later.


Skill Level: Rookie-Apprentice-Virtuoso-Genius
Skills: knit, purl, ssk, K2tog, M1

Sizes: adult xs, s, m, l
Finished Measurements: xs measures approx. 3.5" wide at mid-arm and 20" in length (shown)
Gauge: approx. 28 sts and 44 rows = 4" in St st on 3 mm needles 

Yarn: 100% superwash merino (MC), 114-228 g/4-8 oz, 395-790 yds (361-722 m); small amount of CC in fingering weight (for elbow patches); Note: xs requires one ball, larger sizes require two balls
Suggested Brand: 1-2 skeins of Tosh sock fingering weight merino (shown in William Morris)

Needles: 2.5 mm dpns; 3 mm dpns or size needed to obtain gauge

Other Materials: tapestry needle or teeny crochet hook; 1 stitch marker


Instructions: (Make two.)

Starting at the top of the sleeve, CO 70 (75/80/85) sts with long-tail method and smaller needles in MC. Join in the rnd, being careful not to twist sts. Pm for beg of rnd. Divide sts evenly on needles.

Work in K3, P2 ribbing for 1.75" (approx. 18 rnds) or to desired length of top cuff. Change to larger needles and St st.

Next: Knit 10 rows even.
Dec rnd: K1, K2tog, knit to last 3 sts, ssk, K1.

Rep these 11 rnds 4 times more. 10 sts decreased.

Work even in St st until sleeve measures approx. 14.5 (14.5/15/15)" from beg. Try them on. They should end 3-4 inches below the wrist.

Note: If you would like a slouchier look, work extra rnds here. 
If you would like to get away with making a larger size with a single ball of yarn, you may want to make the total length shorter here.

Next: Rep dec rnd once.
Next: Knit 4 rnds even.

Rep these 5 rnds 4 times more. 10 sts decreased. 50 (55/60/65) sts rem.
Try sleeve on again. Work extra rnds here if you like. They should be 1" shorter than total length.

Change to smaller needles. Work K3, P2 rib for 1” (approx. 10 rnds).


BO fairly loosely in rib or use a 3 mm dpn to bind off. Weave in ends.

Elbow Patches: (Make two.)

CO 15 sts with smaller needles and long-tail method in CC.

Knit 2 rows.
Row 1 (RS): K2, M1, knit to last 2 sts, M1, K2.
Row 2 (WS): K2, purl to last 2 sts, K2.
Rep these two rows four times more. 25 sts total.

Next: Knit.
Next: K2, purl to last 2 sts, K2.
Rep these two rows 7 times more.

Decreases:
Row 1: K2, ssk, knit to last 4 sts, K2 tog, K2.
Row 2: K2, purl to last 2 sts, K2.
Rep these two rows four times more, ending with a Row 1. 15 sts total.

Knit three rows. BO kwise. Weave in ends.

Try on your sleeve, making sure the shaping runs down the inside of your arm. Place the patch on your elbow and mark the placement or pin it on. Sew it in place. Enjoy!